ScannerVision Expression Editor
The ScannerVision Expression Editor shown below is a rich environment in which you can build the metadata expressions that you want to use in your template. It offers several aids that are designed to help you to get the results you expect. One of these is the ability to see the output of your expression using sample data that you provide, in real time. You therefore don’t have to wonder what the output of the expression would be or to process a test document through the system to see the output of the expression. Provided that your sample data represents real-world data, what you see in the expression editor is what you can expect to see during run time.
Available Tags

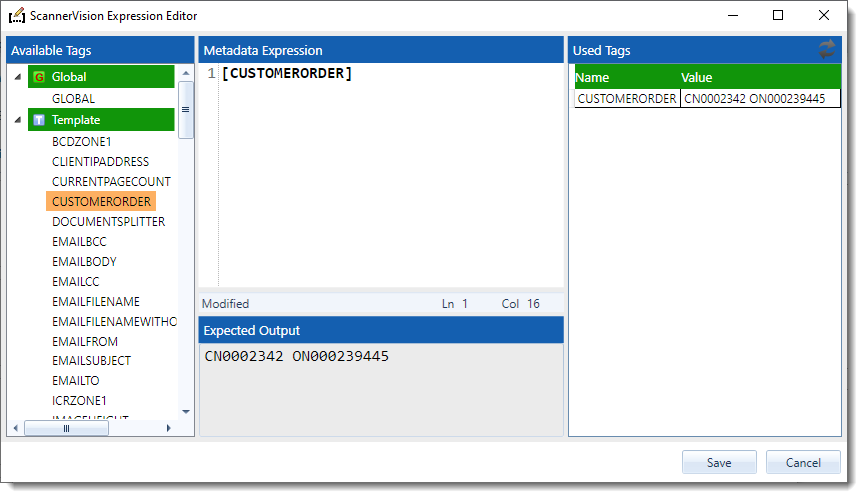
The available tags section contains all the metadata tags that are available for you to use in your expression. The tags are presented in a tree view with the tags grouped into between one and four groups. The groups represent the different types of metadata that is available in ScannerVision namely “Global”, “Template”, “Connector” and “Standard”. At a minimum you will get the Standard group since these tags are always available. The Global and Template groups are visible when global and/or template metadata have been configured respectively. The connector group will show up when the expression editor is opened from a connector setup screen, but only if the connector supports additional tags such as the Windows File System connector with its UNIQUESUFFIX tags.
The groups in the tree view can be collapsed or expanded by clicking the triangle to the left of the group heading. To collapse or expand all groups simultaneously you can right click with your mouse over the tree view and select the desired option from the context menu.
To insert a tag in your expression place the caret in the desired location of the “Metadata Expression” editor window and double click the tag you want to insert.
You can modify tags’ sample data in the Used Tags grid. To reset the sample data to the original values, click the  button in the top right hand corner.
Used Tags

When a valid expression is entered into the expression editor window the Used Tags grid is updated with all the tags that are used in the expression. The grid shows the names of the tags as well as the sample value of each tag. You can edit the sample value in the grid by clicking in the relevant cell. To apply your changes click outside the grid or press Enter. The expression will be parsed using the sample data you entered and the output will appear in the Expected Output window.
Metadata Expression
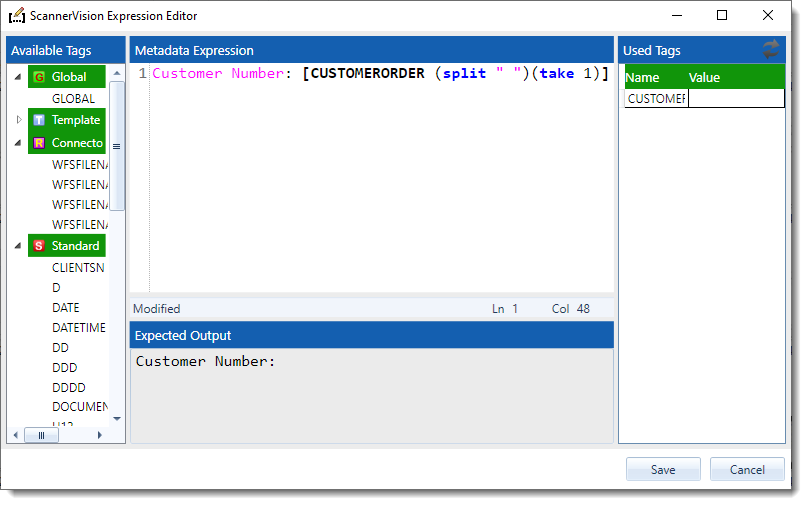
The metadata expression window is where you enter your expression. The editor offers syntax highlighting which colours the various sections of your expression to make it easier to read. Function names are printed in bold, blue font; static text is printed in magenta and tag names are printed in a bold, black letters.
There are various ways to enter expressions and you can use them in any combination you wish:
-
You can type the expression using the keyboard.
-
You can double click a tag in the Available Tags section to insert it at the current caret position.
-
You can use “Code Completion” by pressing Ctrl-Space while the caret is between the square brackets of a metadata tag or the round brackets of a function. A context menu will appear with either tag names or function names - depending on the context of the caret. You can then navigate through the menus using the cursor keys on your keyboard or using the mouse. To insert the selected item in the menu, press the Enter key or left click on it with your mouse. Existing values are replaced with the newly selected ones.
-
You can right click in the expression editor area with your mouse to show the context menu from where you can select the desired action. Depending on the context of the caret in the expression, certain menu options may be disabled.
To use options 3 and 4 above, the caret in the editor has to be in between either square brackets for metadata tags or round brackets for functions. If this is not the case, pressing Ctrl-Space will have no effect and the menu items in the right click context menu will be disabled. Tags or functions names that appear outside the scope of their respective style of bracket is treated as plain text.
In the screen shot above there are three sections in the expression with peculiar highlighting:
-
Plain text. The plain text “Order number: “ is printed in a magenta colored font. Text parameters of functions such as “match”, “join” and “split” are also printed in a magenta colored font.
-
Metadata tag. The CUSTOMERORDER tag appears between opening and closing square brackets “[” and “]” and is printed in bold, black font.
-
Functions. The “split” and “take” functions appear between opening and closing round brackets “(“ and “)” and are printed in bold, blue font.
At the bottom of the expression editor is a status bar with three sections which indicate the state of the editor window. The first section would contain the word “Modified” when the expression has been modified, “Error” when there is a syntax or parsing error in the expression or blank when there is no error in the expression and it has not been modified. To the right of the status bar are two sections that indicate the position of the caret in the editor. The “Ln” value indicates the current line number and the “Col” value indicates offset into the current line.
Expected Output
Whenever a change is made to the expression in the expression editor it is parsed. The parsing of the expression does several things:
-
It validates the syntax of the expression. If there are any errors in the expression the parsing will fail. When this happens the caption of the output window changes from “Expected Output” to “Syntax Error” and the output window will indicate what the error is.
-
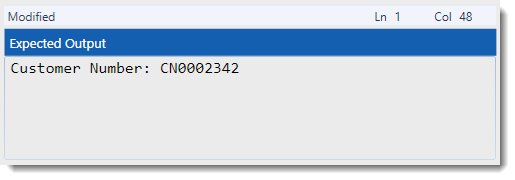
If the expression does not contain any errors, the output of the expression is shown in the output window using the given sample data.
-
If the expression does not contain any errors, the Used Tags grid is updated with the names (if any) of the tags used in the expression. You can then modify the sample data if you desire.
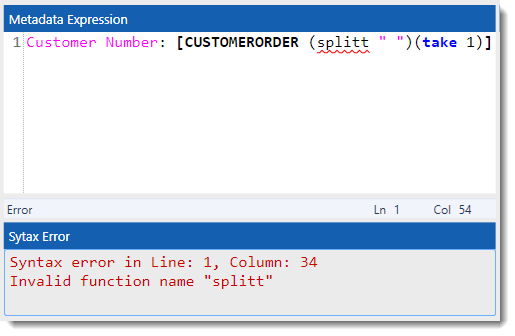
In the screen shot below you can see what the expression editor would look like when there is an error in the expression.
There are several aids to indicate that there is a problem with the expression and to help you to figure out what the problem is. They are:
-
The word “Error” appears in the status bar below the expression editor window.
-
A red squiggly line appears in the location where the problem is. In the screen shot above the line appears under the function name “splitt”.
-
The caption of the output window below the expression editor changes from “Expected Output” to “Syntax Error”.
-
An error message appears in the output window. In the example above the message indicates that the “splitt” function name is invalid.
-
The Save button disables.
After you have entered an expression and you are satisfied with the result you can click the save button. This will copy the expression into the edit box from where the ScannerVision Expression Editor was launched.