Network Server Settings
The ScannerVision Networking Server communicates with clients using a proprietary TCP/IP protocol that has been optimized for speed and which adds very little overhead to the data being transferred. The ScannerVision Networking Server binds to port 1983 by default but you can change this by specifying a different port.
Communication can also be encrypted between clients and the server. When encryption is enabled on the server, communication to all clients is encrypted. If encryption is disabled on the server, clients can still be configured to encrypt communication in which case the communication between the particular client and server will be encrypted.
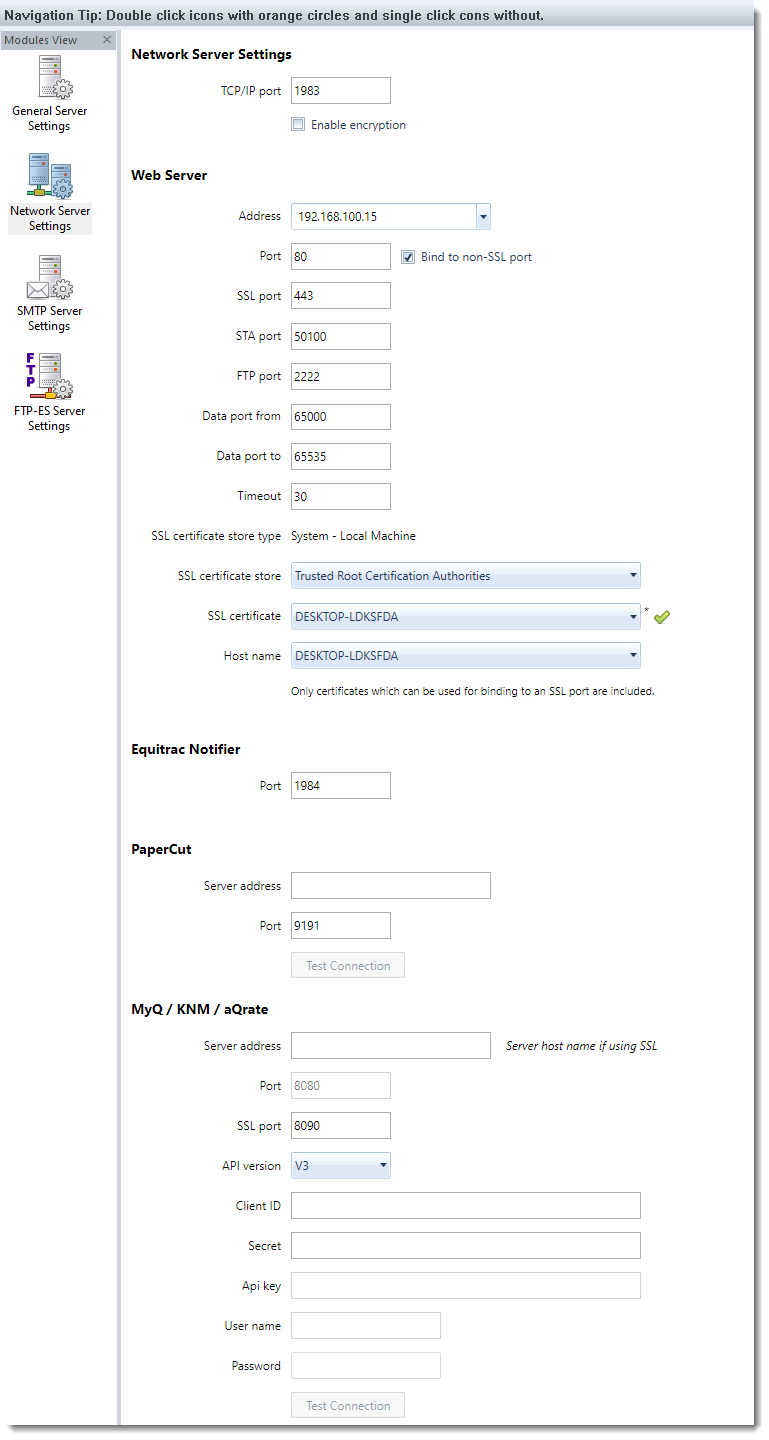
TCP/IP port
The port number on which the ScannerVision Networking Server binds.
Enable encryption
Select this option if you want encryption between all clients and the server to be encrypted.
Note
The ScannerVision network protocol implements a hand shaking mechanism during which the server and client transmits a few bytes of data in an unencrypted form. This is always the case regardless of whether or not encryption is enabled on either end. The data that is transmitted contains no sensitive information such as user names or password.
The data that is sent by the client (which always initiates the communication) is:
| Client protocol version number: | 1 byte. A number indicating which version of the protocol is implemented by the client. The ScannerVision Networking Server supports multiple versions. |
| Client identifier: | 1 byte. A number identifying the client as a Desktop client, Ricoh MFP client etc. |
| Force encryption flag: | 1 byte. A flag that tells the server to encrypt all data after the handshaking has completed - regardless of whether the "Enable encryption" option on the server has been disabled. |
| Client host name: | Unicode character array of varying length - depending on the length of the client's network host name. |
The data that is sent by the server in response to the client is:
| Force encryption flag: | 1 byte. A flag that tells the client to encrypt all data after the handshaking has completed. |
| Authentication type: | 1 byte. A flag that tells the client what type of authentication challenge to present to the user. |
| Minimum supported protocol version: | 1 byte. A number indicating the minimum protocol version that the server will accept. |
| Maximum supported protocol version: | 1 byte. A number indicating the maximum protocol version that the server will accept. |
Web Server Address
The IP address to which web based MFP devices will connect. Select an address that is visible on your LAN. Do not select an address that is local to the server.
Web Server Port
The TCP/IP port on which the ScannerVision Web Server binds.
Bind to non-SSL port
Enables/disables non-secure communication between MFP clients and the ScannerVision Networking Server.
Web Server SSL Port
The TCP/IP port on which the ScannerVision Web Server binds for secure connections. This is used by the Connections web page and when web clients use the “https” protocol.
STA Port
The TCP/IP port on which the ScannerVision Kyocera Web Server binds. A Kyocera MFP establishes a connection to the ScannerVision Kyocera Web Server before they connect to the ScannerVision Web Server.
Web Server FTP
This FTP server is used by MFP’s to upload scanned documents to the ScannerVision Networking Server.
- FTP Port
The TCP port on which the FTP server will bind. The default port for FTP is 21 but it could be any available port up 65536. The FTP server will bind to the specified port for all active IP addresses on the system. So if you have 2 network cards in the server the FTP server will be reachable on both addresses. - Data port from and to
The FTP clients on the Samsung MFPs run in passive mode which is to say that the clients initiate the connection to both the command and data channels of the FTP server. This means that both the command and data ports on which the FTP server binds need to be opened in the server's firewall software. If you want to limit the range of ports that you have to open in your firewall you can do so by limiting the range of data ports the FTP server is allowed to bind on by specifying the upper and lower limit in the respective edit boxes.
Timeout
The timeout used by MFPs to connect to the ScannerVision Networking Server.
Secure network communication
In order to secure network traffic to and from the ScannerVision Networking Server you have to enable SSL port binding and select a port to bind to. The default SSL port is 443. In order for the binding to succeed you have to provide an SSL certificate that was created for this purpose. ScannerVision can generate what is known as a “self signed certificate” which is one where the issuer and subject are the same entity. Depending on how strict the certificate validation is that the client enforces that is connecting to the ScannerVision Networking Server, this self-signed certificate may be all you need. Not all clients (e.g. some MFP brands) allow self-signed certificates but insist that the certificate be signed by a trusted Certificate Authority (CA). ScannerVision gives you the options to select such a certificate as described below.
When you configure ScannerVision for the first time, it will generate a self-signed certificate and install it in the “Local Computer->Trusted Root Certification Authorities” store and automatically select it.
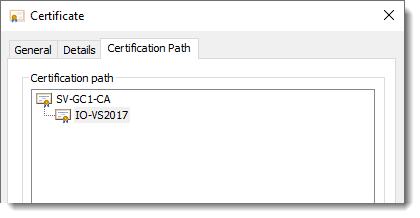
It is essential to ensure that clients are able to connect to a DNS server to resolve the IP addresses of all the links in the Certification Path chain included in the certificate:
SSL certificate store type
This is an informational label that indicates in which storage type ScannerVision is expecting to find the SSL certificate.
SSL certificate store
Select the store in the which the certificate is installed that you want to use.
SSL certificate
Select the certificate you want to use for SSL communication.
Certificates that can be used for SSL communication have to meet specific criteria. Only the certificates that do are shown in the list.
These criteria are:
- It must not be a CA certificate, in other words the "Basic Constraints->Subject Type" must not be "CA" but "End Entity".
-
Key Usage must include:
- Digital Signature
- Key Encipherment
-
Extended Key Usage must include:
- Server Authentication
- Client Authentication
Automatic validation is performed on the certificate when it is selected. The result of which is indicated with a green check as indicated above if the validation was successful or with a red exclamation mark otherwise. To find out what the problem is, hover your mouse over the image. The tooltip will contain details of the validation failure.
Host name
When a client such as an MFP web client connects to the ScannerVision Networking Server over an SSL connection it will validate the certificate it received from the server as part of the SSL handshake protocol. Part of the validation process is to ensure that the host name of the server to which it connected matches one of the alternative name entries included in the certificate - see below. To ensure that this is the case, ScannerVision retrieves the list of alternative names from the selected certificate for you to choose from. Your selection will then be used in the URL that is deployed to MFPs.
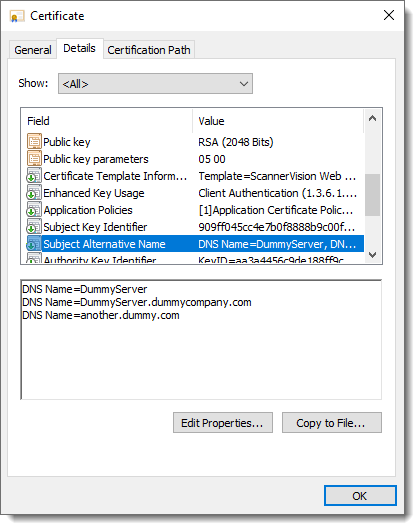
It follows therefore that whenever there is a change in the certificate and/or host name details you will have to re-configure the host name here and redeploy all MFP clients that connect to this server. Some MFP clients do not support Netbios lookups which mean you would not be able to use an entry with just the host name such as “DNS Name=DummyServer” above. In this case you would have to use “DNS Name=DummyServer.dummyserver” entry - which is the preferred one anyway.
If you encounter connectivity issues from a client make sure of the above and that the CA root certificate is installed on the client machine.
Equitrac Notifier Port
The port to which the Equitrac Notifier application connects.
PaperCut server address
The IP address of the PaperCut server. This is used when PaperCut authentication is selected on any Client or Client Group.
PaperCut server port
The port of the PaperCut server. This is used when PaperCut authentication is selected on any Client or Client Group.
Test Connection
Press the “Test Connection” button to verify that a connection can be made to the PaperCut server.
MyQ / KNM / aQrate server address
The IP address of the MyQ/KNM/aQrate server. This is used when MyQ/KNM/aQrate authentication is selected on any Client or Client Group.
MyQ / KNM / aQrate server ports
The SSL and non-SSL ports of the MyQ/KNM/aQrate server. These are used when MyQ/KNM/aQrate authentication is selected on any Client or Client Group. When connecting with API V2 or higher, SSL is compulsory.
MyQ / KNM / aQrate API version
The version of the web service API that is supported by your MyQ/KNM/aQrate installation. Currently only MyQ V7.4.1.30 or later supports API V2.
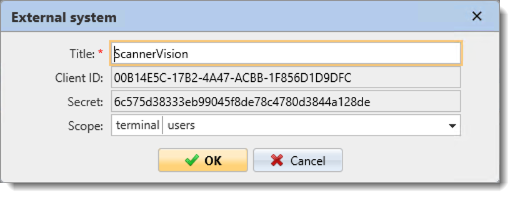
* Please ensure that you add “terminal” and “users” to the Scope selection.
MyQ / KNM / aQrate Client ID (API V2 only)
The Client ID that is generated by the MyQ/KNM/aQrate External System window shown above.
MyQ / KNM / aQrate Secret (API V2 only)
The Secret that is generated by the MyQ/KNM/aQrate External System window shown above.
MyQ / KNM / aQrate Api key (API V1 only)
The API key that is generated on the MyQ/KNM/aQrate server. Refer to the MyQ/KNM/aQrate documentation for further details.
MyQ / KNM / aQrate user name & password
The user name and password the is required to connect to the MyQ/KNM/aQrate server.
MyQ / KNM / aQrate Test Connection
Press the “Test Connection” button to verify that a connection can be made to the MyQ/KNM/aQrate server.
If you are connecting to a MyQ server with API V2 or higher selected you will be required to export and install the MyQ SSL certificate on the ScannerVision server:
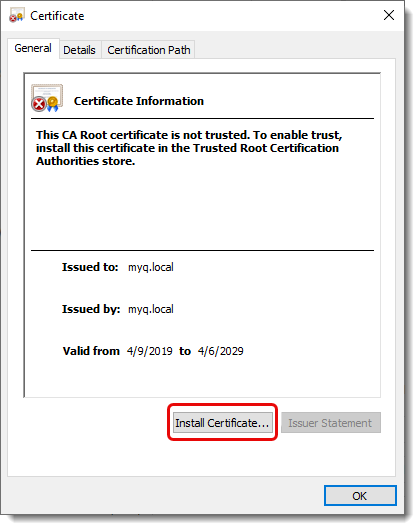
Click the “Install Certificate…” button. You will be presented with the following screen:
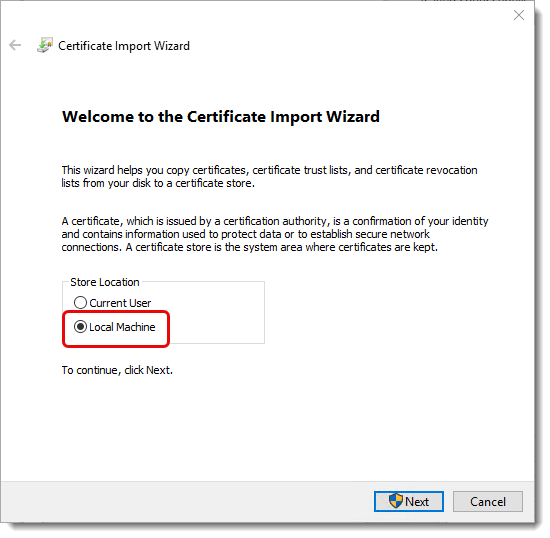
Select “Local Machine” and click “Next”. You will be presented with the following screen:
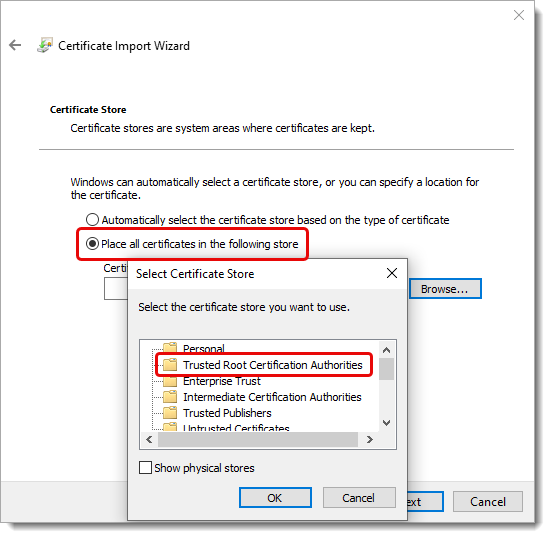
Select the “Place all certificates in the following store” option and press the “Browse” button. On the popup that appears select the “Trusted Root Certification Authorities” option and press “OK”. Continue with the remaining options until the certificate is installed.